Creating the Schedule of Classes
- Allison Urbanczyk
- Breona Rivera
- Melanie Steider2
This document explains the steps needed to create the schedule of classes. Department chairs, program directors, deans, academic support staff, and the Office of the Registrar collaborate to prepare the schedule each semester.
To request access to creating and editing course sections in Colleague, please complete the training, available online via Canvas, and email registrar@valpo.edu when complete.
Daily Class Schedule Template, Effective Fall 2023
Please use the Daily Class Schedule Template with 15-minute passing periods when creating the Schedule of Classes.
Follow any of the links below to navigate to a specific section.
Preparing the Schedule of Classes
Begin by gathering all of the details needed for the schedule:
- Course number
- Title
- Instructor(s)
- Class days and times
- Instructional method
- Requisites
- Restrictions, such as capacity or rules for “majors only”
- Permissions required, such as instructor
- Other details described in this document
The Schedule of Classes Archive is available on the Faculty & Advisor Information page. Download the schedule of classes from a previous term and use it as a starting point for creating a new schedule. The Excel files available include all of the details needed and serve as a great reference tool.
Please continue to coordinate with other departments, your dean, and any other colleagues who currently are part of your schedule planning process.
For anything that currently requires your dean's approval, please continue to request that approval before making a change.
Knowledge Base
For additional information, please read Using the Schedule of Classes Archive.
Course Changes
If your department has submitted a proposal to change a course, Faculty Senate will need to approve the proposal and the Office of the Registrar needs to process that change in Colleague before you create course sections with the new information. Creating new course sections before the change is entered in Colleague will result in outdated course details displaying on the schedule.
Effective Spring 2023: Valparaiso University uses Modern Campus Curriculum (fka Curriculog) to manage catalog and curriculum changes. Training and support are available through the Office of the Registrar.
Entering the Schedule Details
Using the VPN for Working Off-Campus
If you are working from off-campus, please follow this link for assistance and connect using the VPN before proceeding to Colleague.
Using Colleague
Administrative Links: Colleague UI Production
https://confluence.valpo.edu/display/AP/_Administrative+Links
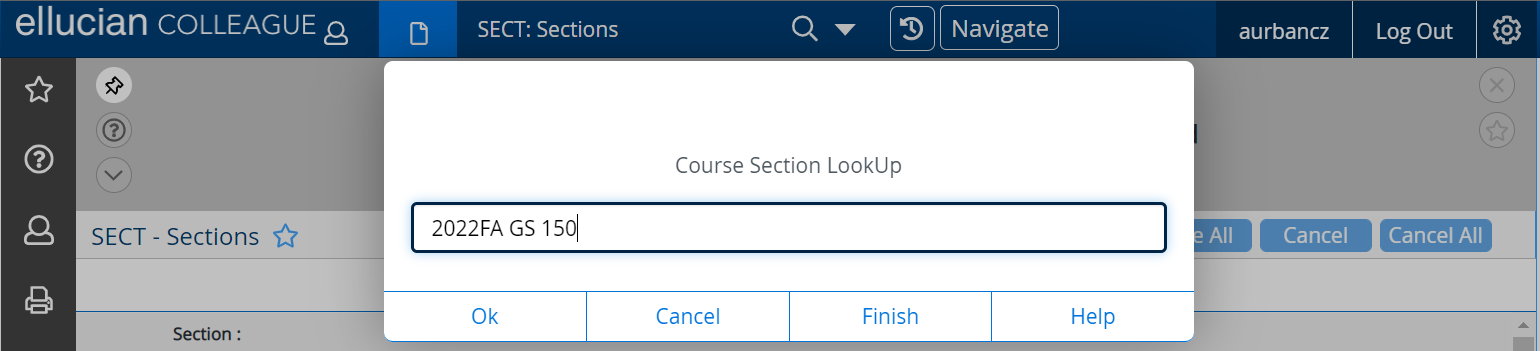
Log in using your usual Valpo username and password. Search for the SECT: Sections form in Colleague.

Enter the term, subject, and course number in the Course Section LookUp field.
Example: 2022FA GS 150
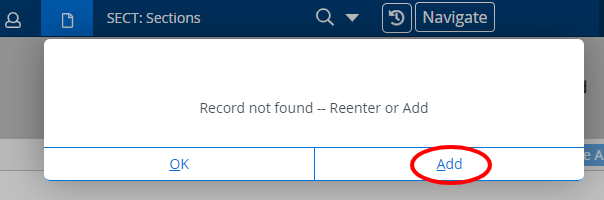
If this is the first section of this course being created within the academic term, you will see a message stating “Record not found -- Reenter or Add.”
Select Add.
If there are already sections, and you want to create another, click the Add button at the bottom of the list of existing course sections.

If there are multiple versions of this course, select the active version (no end date) that meets your department’s needs.

Review each field in the SECT form and make updates as needed before publishing your schedule details in DataVU and allowing students to register.
Many of the fields will be populated with information from the academic calendar and the catalog, such as term start date, term end date, course level, academic level, title, course types, and requisites.
Use the notes in this document to help you make selections for fields such as credit type, credits, grade scheme, instructional method, section cap, billing credits, and cross-listing.
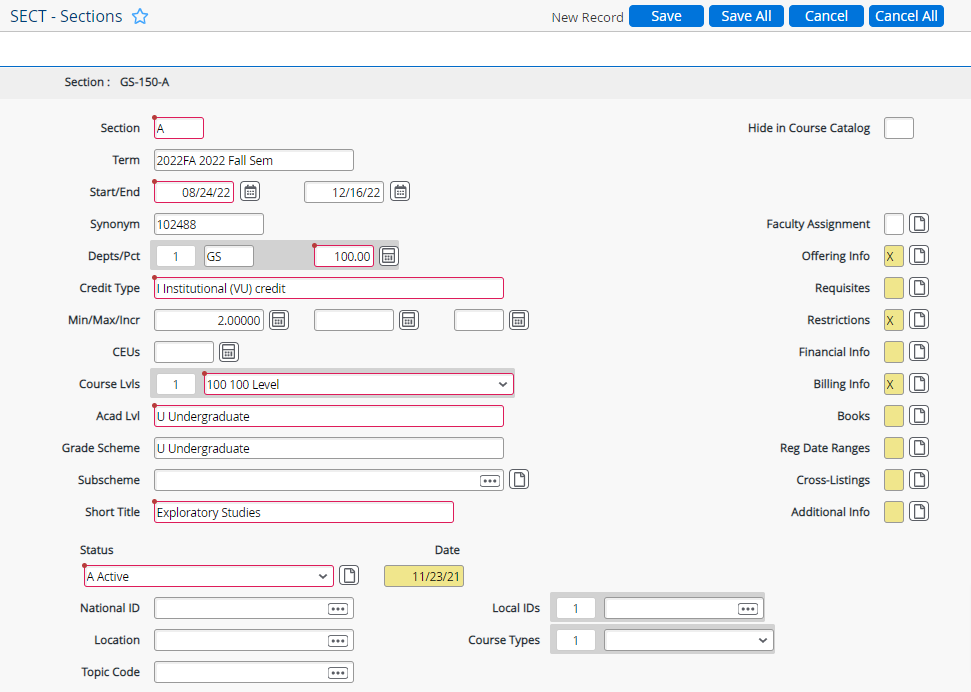
To enter additional information, such as instructor, class meeting details, the section cap, and more, click on the button with the page icon next to each category shown on the right side of the screen.
Section Designation
Enter the section number. Colleague uses the section number to build the course name (ENGL-200-A), which consists of the subject (ENGL), course number (200), and section number (A).
This information should be unique for every section of a course for a term. For example, there should not be two HIST-121-A sections in the term 2022FA.
The table below explains each of the standard section designations and how they're used in the schedule of classes.
| Section | Notes |
|---|---|
| A, B, C, ... | Most common section designation - Course sections offered during the day |
| EV, EVA, EVB, ... | Evening - Course sections offered late in the day, after 4:30 pm |
| OL, OLA, OLB, ... | Sometimes used to indicate online course offerings Not required. Students can use Instructional Method as well as the "Online" filter in Search for Sections to identify online courses. |
| X | Indicates cross-listing. Add to regular section designation Examples: AX, BX, EVAX, ... |
| Initials | For Topics Courses: Use the instructor's initials in the section designation. |
| IS | Independent Study |
| Music | The Department of Music uses section designations to indicate specific instruments for studio lessons. |
Academic Terms
The term field shows the term during which this section is active and will be carried to the student's record when the student registers for this section. This field is populated using the term you entered in the Course Section LookUp above. The term is a combination of the year and a code from the table below.
![]()
| Code | Term | Example |
|---|---|---|
| FA | Fall | 2022FA |
| FB1 | First-half fall courses - Not used for most undergraduate and graduate courses. Only used by select programs, such as MBA. | 2022FB1 |
| FB2 | Second-half fall courses - Not used for most undergraduate and graduate courses. Only used by select programs, such as MBA. | 2022FB2 |
| SP | Spring | 2023SP |
| SB1 | First-half spring courses - Not used for most undergraduate and graduate courses. Only used by select programs, such as MBA. | 2023SB1 |
| SB2 | Second-half spring courses - Not used for most undergraduate and graduate courses. Only used by select programs, such as MBA. | 2023SB2 |
| SMR | Full Summer | 2023SMR |
| S1R | First-half summer courses - Session 1 | 2023S1R |
| S2R | Second-half summer courses - Session 2 | 2023S2R |
Start Date and End Date
These dates are pulled from the academic calendar in Colleague for the term you selected. Do not change these dates. Class meeting days and times are managed under Offering Info, not in these fields.
![]()
Department
The department field and percentage field are populated using the department code from previous offerings. The percentage should always total 100.
![]()
Credit Type
The schedule of classes includes only courses being taught at Valpo within a specified academic term. For that reason, all of the course sections you are entering should have Institutional as the credit type. Type the letter "I" in this field to select Institutional credit.
Different codes are used in this field for transfer credit and credit by examination, but they do not appear in the schedule of classes.
![]()
Credit Hours - Min/Max/Incr
Enter the number of credit hours as shown in the Catalog. Use the Min field for the credit hours of this specific section. For courses that are always offered for the same number of credit hours, use the credit value in the catalog. For variable credit courses, enter the credit hours for this specific section in the Min field and make sure that the Max and Incr fields are blank. Otherwise, you'll see students registered incorrectly for varying amounts of credit for taking the same section.
When creating a new variable credit course, we use all three fields (Min/Max/Inc) at the course (not section) level only for variable credit courses to show the range allowed. Each section on the schedule has a specific (not variable) number of credits.

Course Level
Entering the course level allows Search for Sections to narrow down results to only courses at each course level: 100, 200, 300, etc.
![]()
| Course Level | Description |
|---|---|
| 100 | Undergraduate courses numbered between 100 and 199 |
| 200 | Undergraduate courses numbered between 200 and 299 |
| 300 | Undergraduate courses numbered between 300 and 399 |
| 400 | Undergraduate courses numbered between 400 and 499 |
| 500 | Graduate courses numbered between 500 and 599 |
| 600 | Graduate courses numbered between 600 and 699 |
| 700 | Graduate courses numbered between 700 and 799 |
Academic Level
Entering the academic level allows Search for Sections to narrow down results to only courses at each academic level: U or G. This field restricts registration so that undergraduate and graduate students can register only for courses at the same academic level (U or G). This field also organizes educational records in a way that allows for printing undergraduate and graduate transcripts.
![]()
Grade Scheme
Enter U for the Undergraduate grade scheme or G for the Graduate grade scheme, depending on the course level of this course section.
Entering the grade scheme allows Colleague to accurately record and use final course grades on transcripts, in the degree audit, for GPA calculation, within registration rules, and more.
![]()
| Grade Scheme | Description |
|---|---|
| U | Undergraduate grade scheme |
| G | Graduate grade scheme |
Course Titles - Topics and Seminars
The course title is populated using information from the Catalog. The short title is only customized for topics courses and seminars to indicate the subject of the course section. Otherwise, it matches the course title shown in the catalog. The table below displays examples of customized titles for topics courses and seminars. Please note that "Top:" and "Sem:" are used to indicate that the course is offered under multiple titles with varying content.
This field has a 30-character limit. For that reason, long titles are abbreviated to allow them to fit on transcripts. Often vowels are omitted to shorten titles to fit.
This field is displayed on transcripts, and it must match the title published in the catalog for accreditation and audit purposes except in the case of topics courses and seminars where the course description in the catalog explains that the topics vary.
Tip: Colleague adjusts capitalization in the title field to assist with consistency in capitalization. If you want to retain specific capitalization rather than the default, type the equal sign (=) before the title in this field. When you leave the field, the equal sign will disappear, and the title will retain the capitalization as you entered it.
![]()
| Type of Course | Course Number and Section | Title Example |
|---|---|---|
| Topics | BUS-390-A | Top: Analytics Programming |
| Topics | CVA-390-A | Top: Live Stream Production |
| Topics | GS-390-A | Top: Cmnty, Cultr, & Chng Ldsp |
| Seminar | CC-300-AX | Sem: Ancient & Medieval Phil |
| Seminar | CC-300-BX | Sem: Political Ideologies |
| Seminar | CC-325-A | Sem: Encountering Others |
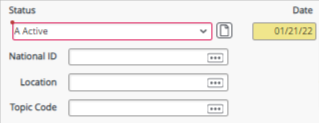
Status
The status of any course section being added to the schedule of classes should be A Active.
To cancel a course section, please update the status to C - Cancelled and email the Office of the Registrar for assistance.

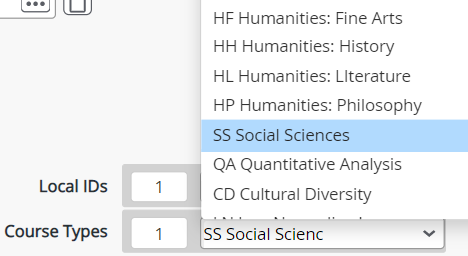
Course Type
Course types are used to facilitate degree audit evaluation and other processes. Courses approved by the General Education Committee and Faculty Senate to meet certain degree requirements are given a course type, which allows them to display properly in the Program Evaluation (degree audit). Once the Progress feature is fully developed in the upgraded version of DataVU, it will replace the Program Evaluation and continue to use course types.
Examples of Course Types: Cultural Diversity, Humanities: Fine Arts, Humanities: History, Humanities: Literature, Humanities: Philosophy, Quantitative Analysis, Social Sciences, Writing Intensive Course (WIC), and Writing in Discipline (WID).
The course type field is populated based on information from the catalog. Some topics courses are approved to meet a general education requirement based on the content being taught in a specific section, and in that case, this field can be customized to reflect approval from the General Education Committee. Once we move to Self-Service Progress instead of Program Evaluation, the course type will need to be controlled at the course level rather than the section level. See the Office of the Registrar for assistance with this.
This field can have more than one value in it. For example, some sections of THEO 200 have both the T2 and WIC course types. This means that they have been approved to fulfill both the 200-level Theology course requirement and the Writing Intensive Course requirement. Click in the Course Types field and use the buttons at the top of the screen to scroll through all values in the field.

Knowledge Base
For a detailed list and descriptions of the course types in use, please read Course Type Abbreviations for the Schedule of Classes.
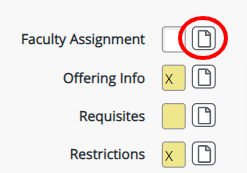
Faculty Assignment
Type the full name of the instructor in the Faculty Member field in row 1. Select the instructor from the list of results that appear.
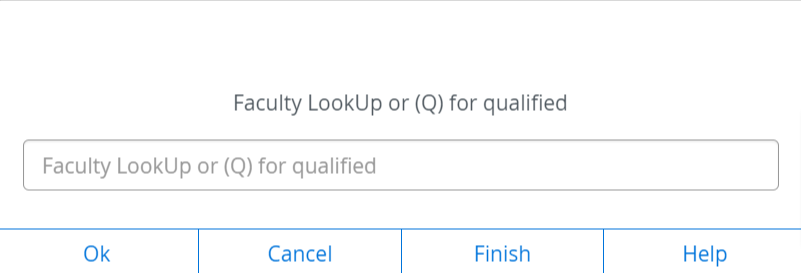
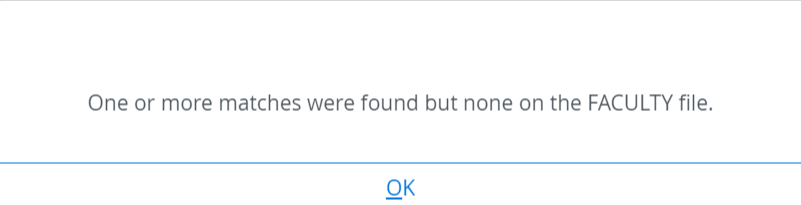
If an instructor is new and has not yet been recorded by the Provost's Office in Colleague as a member of the faculty, you will see an error message.
If the instructor's name has not yet been determined, or if their record isn't yet complete, then use "Staff" as the instructor's name and add the department chair's name in row 2 as an additional instructor. This will display the course to the department chair in ways that will facilitate an update to the instructor's name later (see notes below under Removing or Changing Instructor Name).
Refer to the new schedule details or Schedule of Classes Archive as needed when updating the Load field.
- Regarding Cross-Listed Sections
- Only the primary section will have the full load value; all sections cross-listed with the primary section will have a load of 0.
- Credit hours and billing details are the same for all cross-listed sections, but the loads will vary so that only the primary section has a load greater than 0.
- If cross-listed courses have different subjects, assign the load to the department of the instructor. Example: If courses from History and Political Science are cross-listed, and the instructor is in the History Department, assign the load to the History section and give the POLS section a load of 0.
Do not update the Instructional Method on this screen; use the Offering Info screen. Updates to the Offering Info screen are reflected here once they are saved.
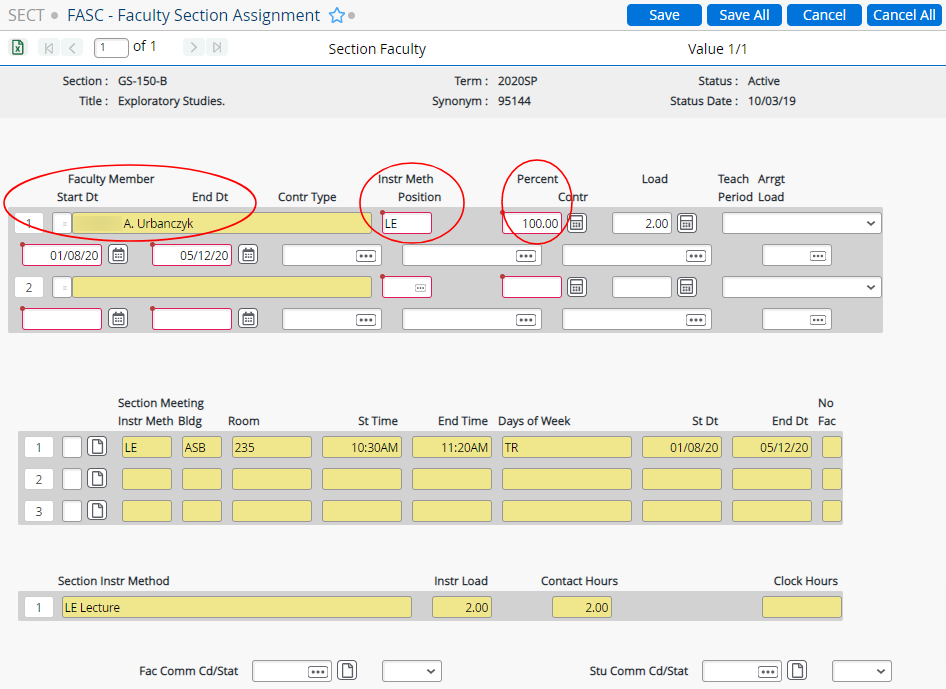
Multiple instructors
If a course section has multiple instructors, record the additional instructors in the next row(s) and adjust the Percent field so that they total 100 percent and give the appropriate load percentage in each row.
Any sections with "Staff" as the instructor's name need the department chair's name in row 2 as an additional instructor. This will display the course to the department chair in ways that will facilitate an update to the instructor's name later.
Removing or Changing Instructor Name
Leaving the instructor's name blank under Faculty Assignment displays that the instructor is "TBA" on the schedule of classes in DataVU.
To remove an instructor's name from the course section, use the same form used to enter the instructor: Faculty Section Assignment (FASC).
Click on the numbered button in the row of the instructor to be removed as shown below.
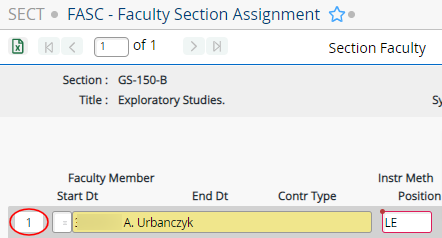
When asked to Select Table Operation to Perform for this row, click on "Delete."

To leave it blank, Save All.
To change instructor instead of leaving it blank, enter the new instructor name as shown above under the Faculty Assignment heading.
Offering Info - Class Days and Times
Instructional Method
Type an Instructional Method code into row 1. Examples: LE, OL, OS, OH, HY, LIV
The instructional method is one of the criteria used in classroom assignment. Please be sure to read the definitions linked below for assistance in choosing an instructional method that will provide you with a class meeting time and a classroom if they are needed.
Knowledge Base
For complete details regarding Valpo's instructional method definitions, read Online Instructional Methods.
Updating the instructional method on this screen will automatically update a similar field on the Faculty Assignment screen.
Teaching Load
Update the Instructor Load to match the similar field on the Faculty Assignment screen if they do not already match.
Schedule Print Times
Enter the Start Time, End Time, and Days of Week into the appropriate fields under Schedule Print Times.
Every time new schedule information is entered on the Section Offering Info page, enter a "Y" in the Rebuild Calendar field and press enter. When this happens, Colleague updates and compares all schedule details and returns an error message if it finds any conflicts.
![]()
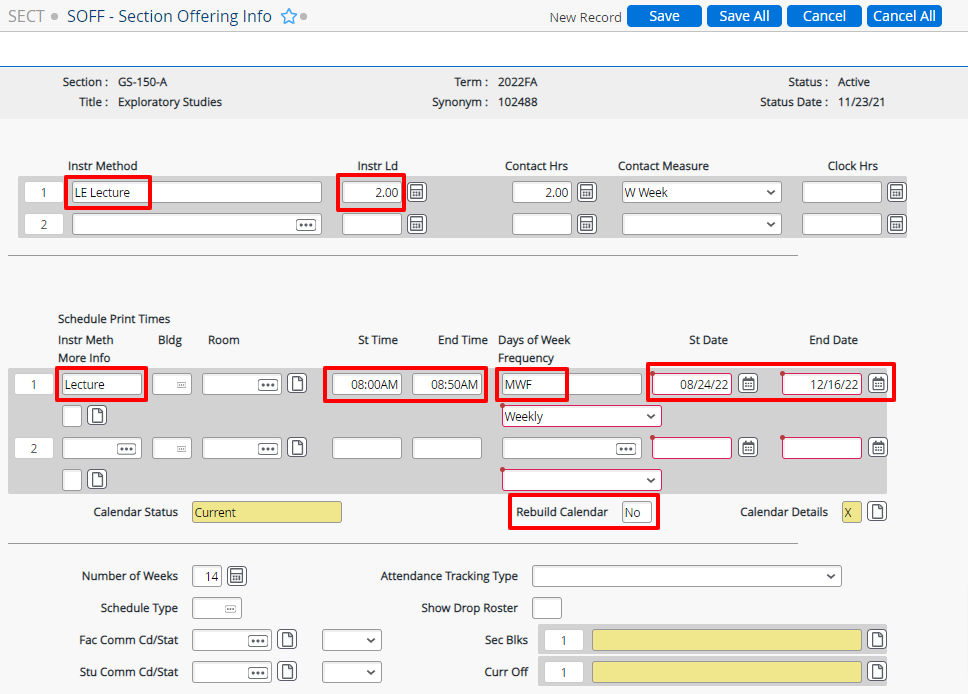
If the course section has multiple meeting times on different days of the week, enter additional days and times using row 2. If one row is for a lecture, and the second row is for a lab, be sure to change the Instructional Method as needed for each row.
If the days and times are still To Be Determined, click on the Instructional Method field in row 1 to populate it and save your work. As you save and leave this screen, acknowledge the error message letting you know that meeting days and times are missing and continue to save.
Short Course Meeting Dates
For courses that meet only during the first half or only the second half of the academic term, do NOT change the Term or the Start and End Dates in SECT; instead, use the Offering Info screen to adjust the meeting dates. Adjust the St Date and End Date under Schedule Print Times (shown above) as needed to reflect the short course dates on the Academic Calendar.
- If the course is being created for the first half of the term, leave the start date, but adjust the end date to match the last day of the first half short courses shown on the Academic Calendar.
- If the course is being created for the second half of the term, adjust both the start date and the end date to match the dates for the second half short courses shown on the Academic Calendar. Please note that second half short courses end earlier than full semester courses because they do not include the Final Examination period.
One-Day Courses
Example: BUS-100 labs
Use the Section Offering Info screen to change the Frequency from Weekly to “YW - Yearly, Same day” and change the start/end dates to match the meeting date. This will allow students to see the date of this one-day course section on their class schedule.
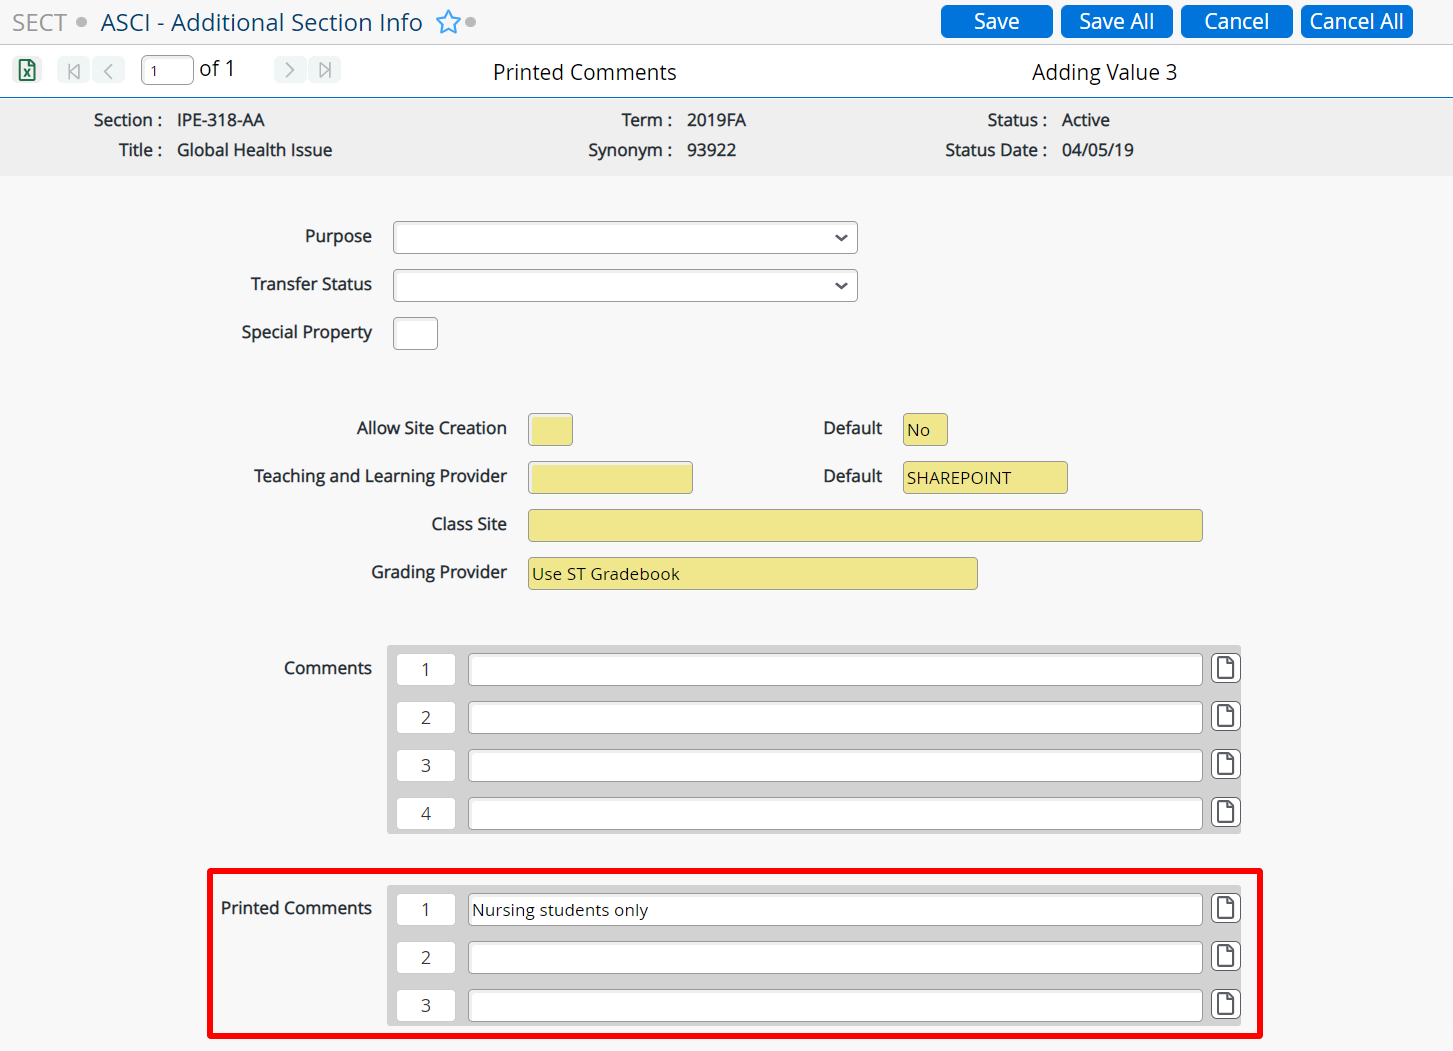
Also, be sure to enter Printed Comments on the Additional Information (shown below) screen stating the meeting date. Printed Comments are displayed for course sections in DataVU.
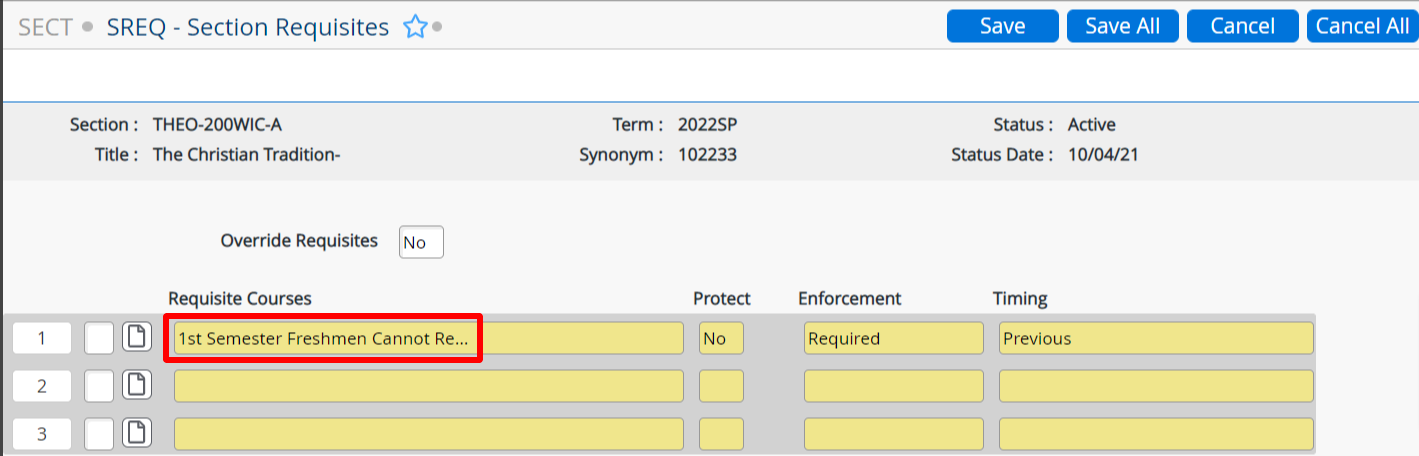
Section Requisites
This screen is populated using information from the Catalog. View this screen to make sure that any requisites are displayed as expected. Remember to refer to the Schedule of Classes Archive to view the requisites used for previous schedules.
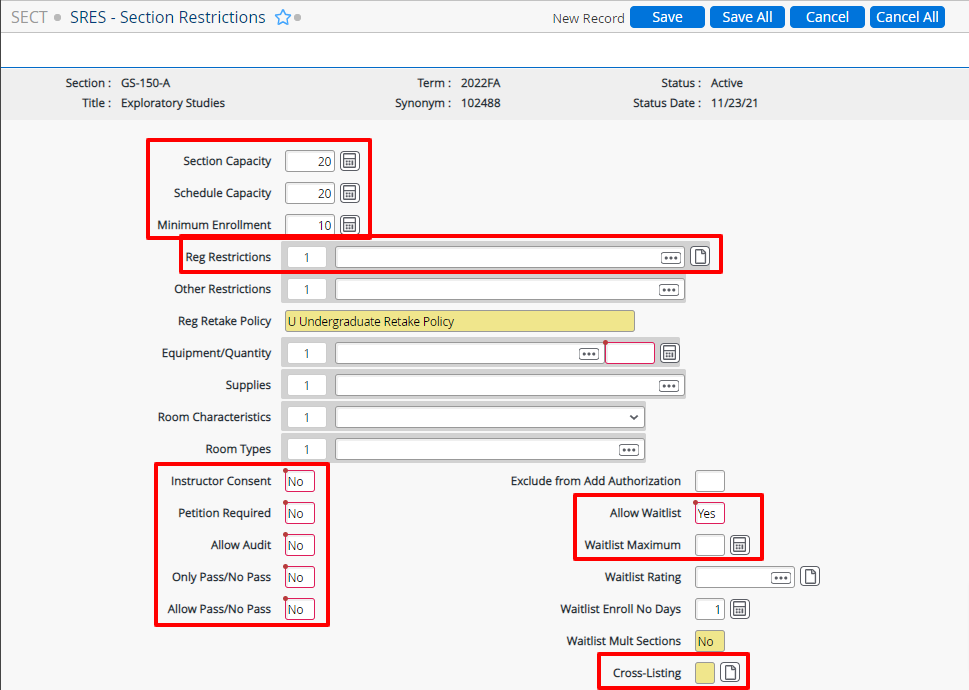
Restrictions, Including Capacity
Enter section capacity, schedule capacity, and minimum enrollment values as described in the Adjusting Course Section Caps article linked below. Section capacity determines the number of students permitted to register for this course section. Schedule capacity does not impact registration; it's a reference tool that helps us to remember the highest number that should be allowed (this may factor in seats in the room or a maximum determined by the department or college).
Classrooms are assigned near the start of each term. Once you have an assigned classroom, please keep the room capacity in mind as you adjust any section caps. Also, please follow guidance from your dean regarding appropriate caps for course sections.
Coming Soon: An article is being written with current classroom capacity information for your reference.
The Reg Restrictions field shows any registration restrictions from the Catalog, such as those allowing students only with specific majors or minors. Use information from the Schedule of Classes Archive to check this field for consistency.
If this course section requires instructor approval for registration, enter a Y for Instructor Consent. Otherwise, leave an N in this field.
If this course section requires department chair or program director approval for registration, enter a Y for Petition Required. Otherwise, leave an N in this field.
Allow Audit should be left with an N. It is only changed to a Y when a student uses an Audit a Course form and is approved.
Only Pass/No Pass should have an N for courses that use the full grade scheme or a Y for courses that are always graded S/U according to the Catalog, such as internships.
Allow Pass/NoPass should be left with an N. It is only changed to a Y when a student uses a Satisfactory/Unsatisfactory Grading form and is approved.
Allow Waitlist should be Y for any course that uses a waitlist.
If this field is set to Y to allow a waitlist for the section, be sure to enter a "1" in the "Waitlist Enroll No Days" field to indicate that students who are sent an email to register from the waitlist have one day to respond before the next student is contacted. If this field is left blank (null value), it will cause errors in the waitlist process, and the students on the waitlist will not be notified when seats are available.
Waitlist Maximum isn't required, but it can be used to set a limit on the number of students permitted to use the waitlist.
You can use the Cross-Listing button to access the Cross-Listing screen described in the Cross-Listing section below.
Capacity
In Fall 2024, department chairs, program directors, and deans reviewed three years of registration data and calculated a Schedule Capacity for every course Valpo offers. This allows the Registrar team to assign classrooms more accurately and earlier than before. It is also essential for workload and course fill rate calculations.
For full details, please read Adjusting Course Section Caps.
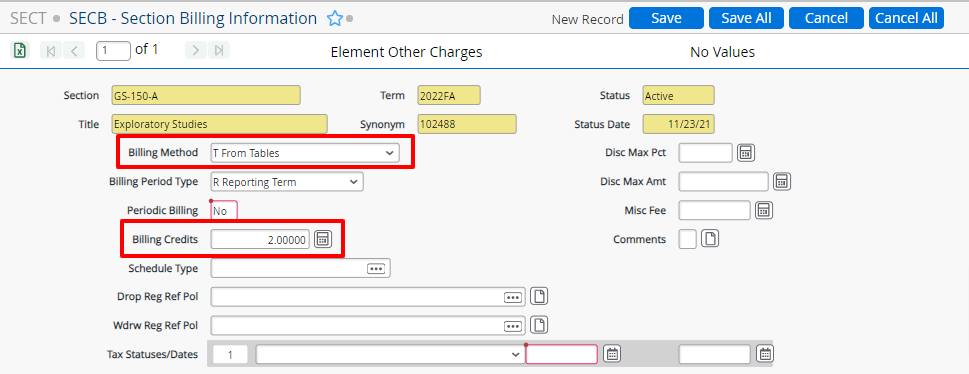
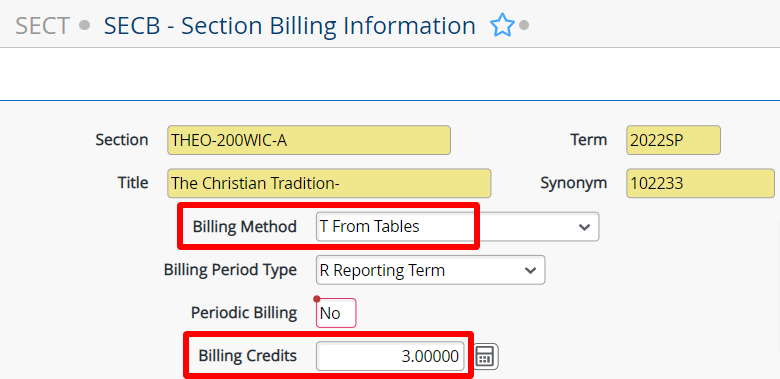
Billing Information
Check the Billing Method to make sure it has a T for "From Tables."
Enter the number of credits for this course into the Billing Credits field. Credit hours and Billing Credits should match.
Exception: Some courses, such as MBA, have sections with a different billing method. Please read the Billing Method article for more details.
Examples:
- 3-credit courses need 3 Billing Credits.
- 2-credit courses need 2 Billing Credits.
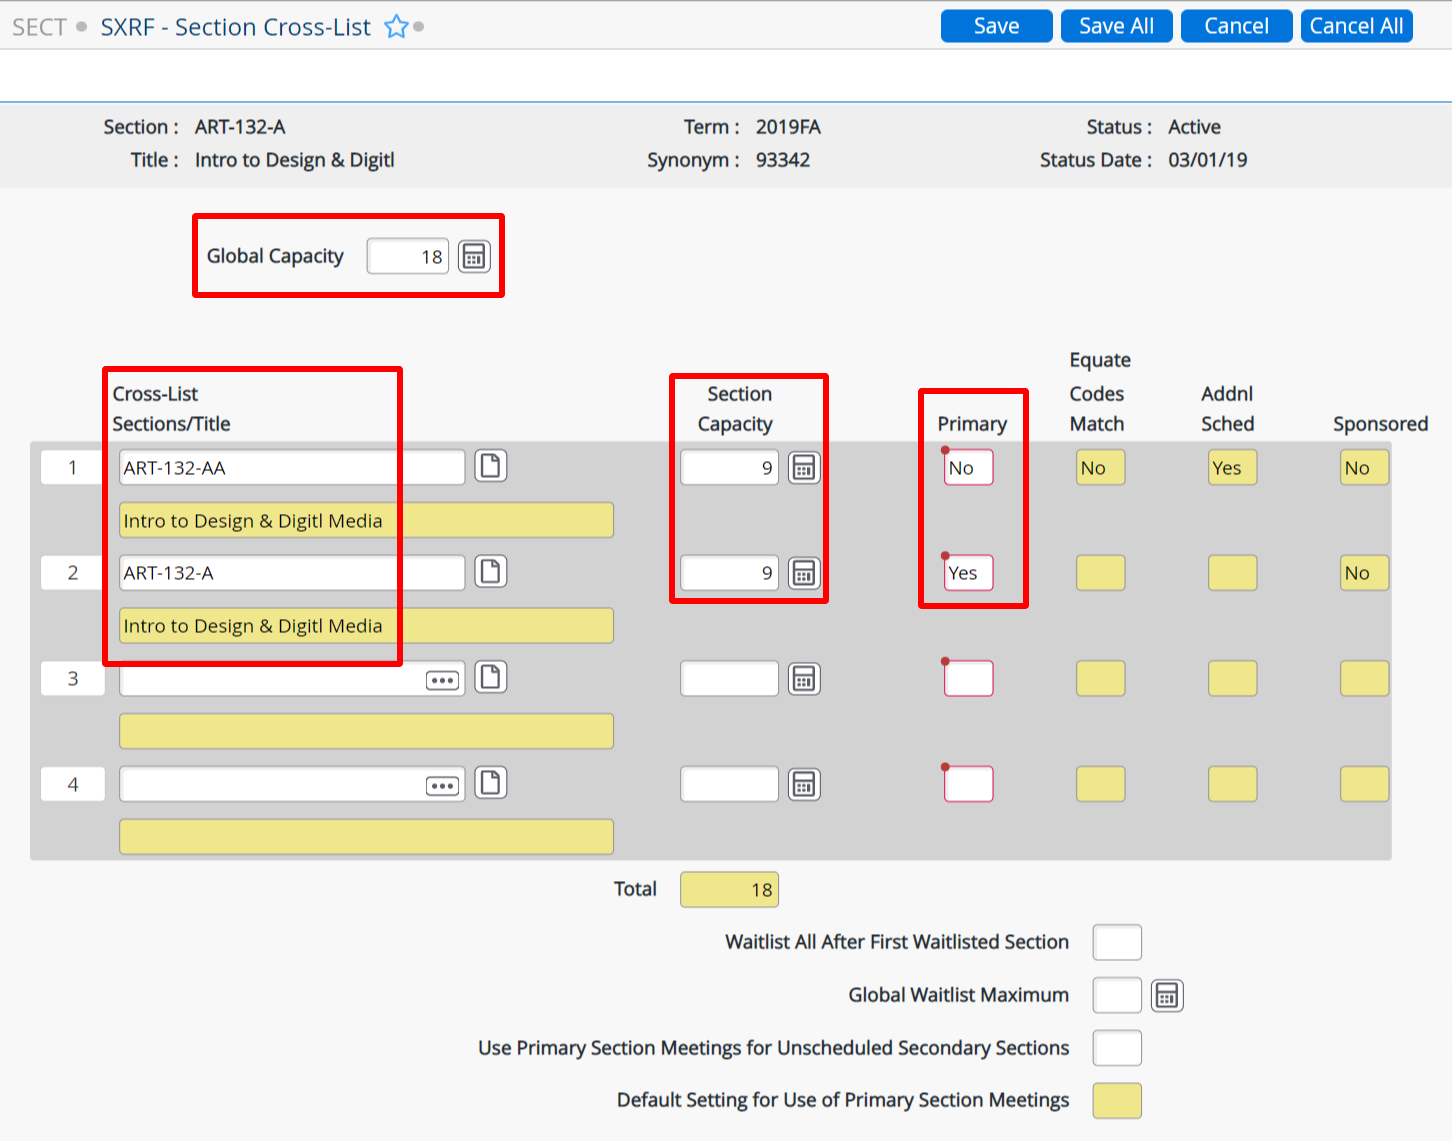
Cross-Listing
Data Accuracy
Cross-listing and common room group details in Colleague are essential for accurate room assignment, workload calculation, and course fill rate reporting. Institutional Effectiveness and Registrar rely on the data in this section for optimal classroom sharing and data analysis.
Before entering details on the Cross-Listing screen, you must first create all of the sections that will be cross-listed. Once you have them all created, return to the primary course section, select the Cross-Listing page, and enter the cross-listed course sections as shown below.
Example: Type "ART-132-AA" into the Cross-List Sections field in row 2. Tab through and update the other fields as needed.
Only 1 section is the Primary ("Yes"), and the rest should have "No" in this column.
Regarding Global Capacity and Section Capacity for cross-listing Read the Adjusting Course Section Caps article for more information, including examples of cross-listed course section capacities with registration scenarios.
Policy Details
For additional information, please read the Course Cross Listing and Common Room Grouping Policy and Adjusting Course Section Caps.
DO NOT cross-list sections and also use common room group - choose one or the other based on the policy linked above.
Load Credits for Cross-Listed Courses
Be sure to check load credits to make sure they are distributed appropriately across cross-listed sections. See notes above in the Faculty Assignment section for more details.
If the cross-listed courses include both undergraduate and graduate academic levels, set the primary course as the undergraduate one.
Remember to give the primary section the load credits and enter 0 for the load of all other cross-listed sections.
Common Room Group
To create a co-roomed section, start by navigating to CRMG and entering the name of the common room group. It’s best practice to include the term and section details in the name for clarity—for example, “SP25ENGL260/360.” Once you’ve entered the name, click OK to proceed.

The Group ID has now been created. Next, enter the term in the Term View Filter field.

Enter each section into the rows provided. The system will prompt you to confirm the correct section—select the appropriate one from the options provided.

Once you’ve selected the sections, they will populate in the rows below.

Save All.
To confirm that a section is common room grouped, go to the 'Offering Info' tab under SECT.

You'll see an 'X' in the box under the instructional method, indicating that the section is part of a common room group.

After detailing in, you can see the Common Room Group ID displayed.

Additional Information - Printed Comments
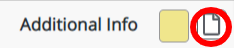
Click on the button with the page icon next to Additional Info.
Select the ASCI - Additional Section Info option and click OK.
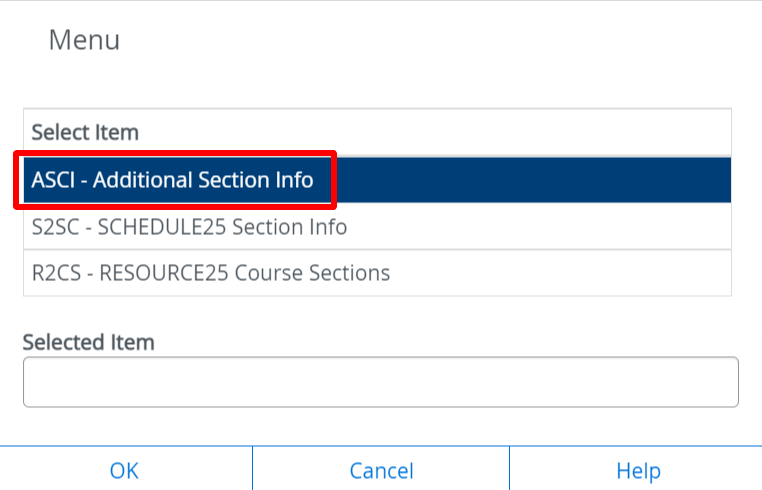
Use the Printed Comments field to display important information for students and advisors regarding the course section. Examples:
- Chair's approval reqd
- Instr approval reqd
- Cross-listed with _____
- Special meeting notes
Do not enter any Printed Comments regarding prerequisites, corequisites, or other details. DataVU already displays these details.
Abbreviations
Follow this link to view common Class Schedule Abbreviations.
Abbreviations sometimes used in comments or other fields:
| Abbreviation | Notes |
|---|---|
| alt | Alternate, Alternates |
| beg | Beginning |
| Co-op | Cooperative |
| coord | Coordinator |
| Coreq | Corequisite |
| div | Diversity |
| equiv | Equivalent |
| FR | Freshman |
| Instr | Instructor |
| JR | Junior |
| Prereq | Prerequisite |
| req, reqd | Requirement, Required |
| SO | Sophomore |
| SR | Senior |
| Top: | Topics Course |
| wk, wks | Week, Weeks |
Remember to "Save All" of Your Work
Once you have entered all of the course section details, click the Save All button at the top of the scene. You will be asked if you want to Update, Cancel, or Return. Update saves all of your work. Cancel will cancel the updates you've made. Return will let you go back into the form to make additional changes before saving.
You can also use the Save button, but that will ask you to save and update multiple times as it saves pieces separately.
Whenever you look up a record but are not making changes to it, it's best to cancel out just to be sure nothing is changed by accident. If you're updating a record, remember to save your work using the Save All button.

THE FINAL STEP: Reviewing the Schedule
Once you have finished entering all of the details for the schedule of classes, there are two ways you can review the full set of course sections and proofread the details:
- If the schedule is already posted online for public viewing, use Search for Sections in DataVU.
- If you need a spreadsheet with more detail, or if the schedule is not yet published online, email registrar@valpo.edu and request an Informer report and specify the subject(s) or department(s) needed.
Knowledge Base
For assistance, read Catalog Search in Student Planning.
How to Cancel or Delete a Course Section
If you make an error, or if your department decides to cancel a course section, please take the following steps:
- From the SECT screen in Colleague, change the Status field from A for Active to C for Cancelled.
- Email registrar@valpo.edu to let us know. We'll complete additional steps to finish the process.
Support
Contact the Office of the Registrar with any questions.
Email: registrar@valpo.edu